Sunday, 22 July 2012
Friday, 29 June 2012
Here it is!!!


Since appearing on Create & Craft over the weekend 22nd-24th June, many people have been requesting the instructions for the cracker gift box again.
I am pleased to upload it for you now! The instructions will also appear on the Kanban blog and Facebook Page.
Keep an eye on my blog right here though......as I have now designed a new version and also made an alternate version of the original. These will be uploaded very soon, so watch this space!!!

Step One:
Choose the cardstock of your choice for the cracker.
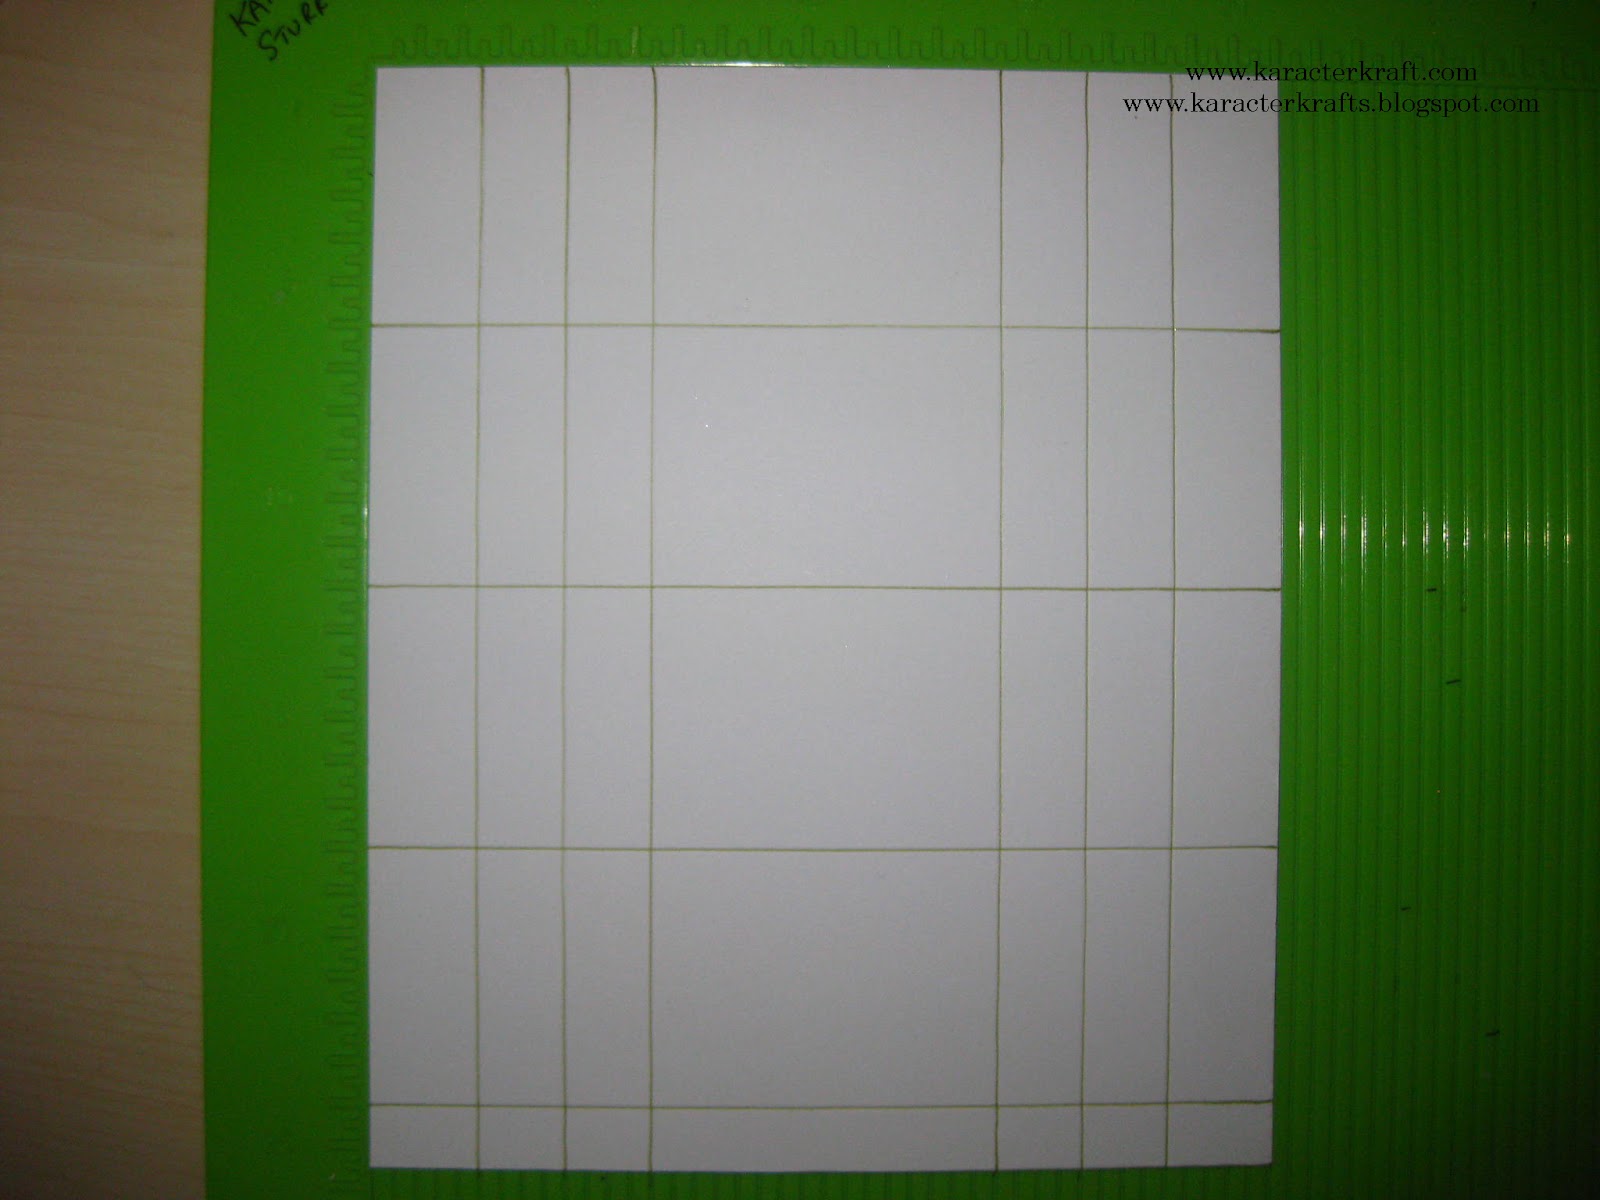
You need to mark and score with first lines with the card landscape way on as shown above.
A Hougie board is perfect for this project, but if you don't have one, then a ruler and pencil to mark is fine and then score using any scoring board between the marks made. I have used a pen on my instructions, so that you can see the score lines clearly.
You need to score at measurements 6cm, 12 cm, 18 cm, 24 cm and 25.5 cms
use the 25.5 cm mark as a guide for cutting off the excess card. I have shown the section to be removed on the photo. This will leave a 1.5 cm tab at one end.
Step Two:
Now turn the cardstock so that it is portrait way on.
This time you need to score lines at measurements of 2.5 cm, 4.5 cm, 6.5 cm, 14.5 cm, 16.5 cm & 18.5 cm

Step Three:
If you have a border punch, you can now punch along both longer edges of the cardstock.
If you don't have a punch, you can decorate the edges with peel offs, or adhesive borders once the cracker has been put together.

Step Four:
Using a scoring tool, now crease all scored lines sharply, across one set of scorelines.

Step Five:
Turn the card around and score the other set of scorelines.

Step Six:
Put your cardstock landscape way on again ready to mark your next guidelines.
You need to mark 2cm away from each scoreline, top and bottom and also 2cm from the end of the cardstock, without the tab

Step Seven:
Using the other scorelines as as a cutting guide. Cut diamond shapes from the cardstock as shown above.
Mind your fingers with the craft knife!
It is best to use a steel edged ruler with your knife as it will help protect your fingers.

Step Eight:
Take note of how the cutouts have been made at the tab end of the cardstock. It is important
to get this right.

Step Nine:
Now you are ready to start putting the cracker together.
On the patterned side of the cardstock, put some strong double sided tape on the tabbed end of the card (including the small tabs where the punched edges are)

Step Ten:
Now stick the tabs under the other end of the cracker to begin forming its shape as shown above.

Step Eleven:
Push the ends of the cracker in so that the score lines form the 'pinched' ends of the cracker.

Step Twelve:
Now tie ribbon, cord or raffia of your choice around the pinched ends of the cracker.
(Don't forget to add a gift or chocolates etc before tying both ends!)

Step Thirteen:
Finally, trim the cracker with flowers, snowflakes or whatever you like to make it look pretty!
Tuesday, 26 June 2012
Hi everyone,
Well what a week its been!
I was draughted in at the last minute to launch the Pick Of The Week for Kanban on Friday 22nd June and did further shows on Saturday 23rd and Sunday 24th too!
I had a whale of a time and enjoyed every minute of it and received lots of fabulous feedback from C&C themselves and also the wonderful viewers.
I have no idea when I may be back, but hope that the opportunity arises for me again in the future.
During the time I was there, I demonstrated a Christmas Cracker shaped gift box. We have had so many requests for the instructions of this to be put out, so I am currently working on this for you.
The instructions will go on the Kanban blog and I believe also the Facebook page. I will also be uploading instructions on my own blog and I am also working on some new designs for different versions which will also be uploaded to my own blog.
Watch this space!!
Wednesday, 13 June 2012


Friday, 8 June 2012


Sunday, 3 June 2012
Sunday, 20 May 2012
I just thought that I would quickly pop on here in between jobs and list one of my new Kanban DT entries.
It is a bit of an illusion card (I do of few of these) and I hope that you like it.


It is a bit of an illusion card (I do of few of these) and I hope that you like it.

Items used to make this card were as follows:
Kanban Shaped
Card
Pearl Card
Periwinkle – Lilac
(CRD 1910)
Victoriana
Embellishments (PCT 1912)
Clear Acetate

A side-ways view

A closer look at the detail.
Saturday, 12 May 2012
Here is a photo of one of the samples that I made for the Kanban 4 Day Deal last week.
I used a photograph of a normal teapot and blew up the image into a larger size and then traced round the outline before altering the shape of the spout , lid and handle by hand to make it individual. This way, I was able to create my own unique template.


I used a photograph of a normal teapot and blew up the image into a larger size and then traced round the outline before altering the shape of the spout , lid and handle by hand to make it individual. This way, I was able to create my own unique template.

The card-stock and flag embellishment was taken from the Kanban 4 Day Deal Kit
I also used elements from the stackables and the butterfly kits that were also
available on Create & Craft.
The flowers were made using the Kanban textured card kit and were cut using Spellbinders dies
which were then rolled with the aid of a quilling tool and the petals shaped
a little by hand.

Here is a closer view of the embellishments.
Hello everyone. It's nice to see some sunshine in South Yorkshire again today!
I need to find time to upload quite a few pictures over the next few days if I can. Just to start off, here is a card made for my Kanban Design Team album.
It is a 'floating frame card' which I actually demonstrated on one of the Create & Craft shows, although it was a much smaller version on there.
I will put together a tutorial at some point for those that missed it.
The Kanban items used for this card are:
Calligraphy Rose –
Pink CRD1453
Fashion Floral frames
– Pink & Cream PCT2297
Embellishments from
Delightful Decoupage PCT2302
Silver Mirri
Card
Pale Pink Pearlescent
Card

This photo shows a side view, so that you can see
the frame 'floating' in front of the card itself.
Friday, 11 May 2012
Wednesday, 9 May 2012
Good morning everyone!
I am sorry that it has taken me a few days to find time to update my blog, but my feet have hardly touched the ground over the last week or so!
And what a week it has been!!!
I made my debut on Ideal World's Create & Craft Channel last Wednesday, when I partnered the lovely Dawn Wheeler throughout the day, promoting the fabulous Kanban Cool Brittania range.
I was the one doing the demos as Dawn talked about the products, which proved to be a VERY big hit with viewers.
On Thursday morning, I again partnered Dawn, before she took sail on the Create & Craft Cruise!
More slots followed on Thursday and I was allowed to go solo, which was great fun with both Nigel later that afternoon and Leonie in the evening.
I was delighted to hear that the 4 day deal sold out during my final show.The add on kit, the butterflies, the specialty card pack plus lots more had also sold out beforehand. So all in all, a fantastic time.
I would also like to thank so many people, whom I have never heard from before, who sent me e-mails and messages of support and comments about how much they had enjoyed my demos etc.
It does appear that so many people would love to see instructions put on my blog after seeing the show, so I am hoping to find the time to do this very soon, plus upload photos of some of the samples that I made too.
I am not sure when I will next be back on Create & Craft, but hopefully it won't be too long, as I can't wait to repeat the experience. I was made to feel so very welcome by all of the staff, producers, directors and presenters alike.
Thank you Kanban for giving me the opportunity :)

Friday, 27 April 2012
Good morning everyone!
I have a few very busy days ahead of me, so I may not be able to post for a little while after today.
I thought that I would just put my latest card design on my blog for you to see.
This week my class ladies were given a project I designed of a wedding/anniversary card. The results were stunning!
We used mainly white card, with just a flash of colour here and there by addling the odd gem or liquid pearls to embellish.
After the project was complete, I wondered how the design would look made from my favourite Kanban Kandi Core cardstock, so I had a play and came up with the card below. I hope that you like it!
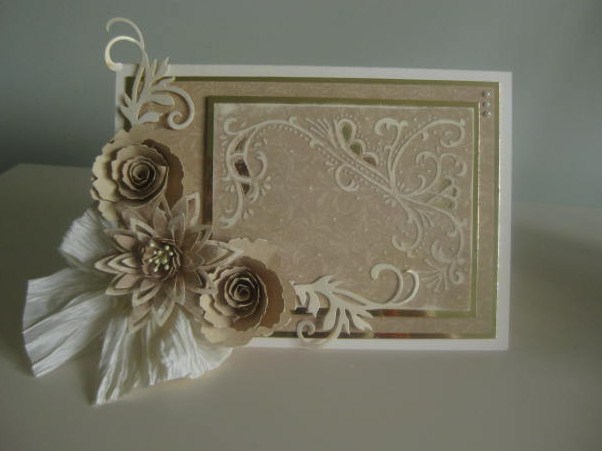
The products I used were:
Ivory base card
Kanban Gold Mirri Card
Kanban Kandi Core Taupe- Scroll (CRD1820)
Kanban Bling
The handmade flowers were created with Spellbinders Dies
and the background layer was a Marianne Designables Embossing Folder
(all products available from Karacter Krafts Ltd)
www.karacterkrafts.com

Here is a close up of the handmade flowers.
Sunday, 22 April 2012
Here are images of my 2nd project for the Kanban Design team. It is a complete contrast to to the soft and pastel colours of the first project. I hope you like it!!


This image shows the open view of my card. I have used acetate at the bottom of the card
with a delicate punched border added for effect and stability.
Products used are:
Kanban ivory
cardstock
Backing card
CRD1698
Palazzo Frames Black
& Beige PCT2199
Simply
Fabulous-Burlesque Blush paper Craft Toppers
PCT2195
Simply Fabulous
Sentiments PCT2196
Kanban
Bling

This image shows the card in a 'closed' position, so that you can see
the inner of the card showing through the acetate.
Hello everyone!
I haven't uploaded for a couple of days as I have had a bit of a hectic week one way or another. The coming week is looking like it may be more of the same, so today has been a welcome day off.
Here are some pictures of a little card I have just made using Kanban products.


I haven't uploaded for a couple of days as I have had a bit of a hectic week one way or another. The coming week is looking like it may be more of the same, so today has been a welcome day off.
Here are some pictures of a little card I have just made using Kanban products.

For this card I used the following products:
Kanban Die-cut card
Silver Mirri card
Backing Card CRD1517
Victoria Blossom Paper Craft Flowers PCT1607
(these were hand cut with scissors and coiled)
Victoriana Lace Butterflies PCT1891

Here is a side view which shows a little more clearly the 'swing' top I created
Sunday, 15 April 2012
I hope everyone has had a good weekend!
I managed to get all of my important jobs done by the end of the day, so decided to get on with my latest Kanban Design Team Project.
I had a box of after dinner mints, which looked a little boring as a gift, so decided to give it a face lift!
Here it is below:

For this project I used the following Kanban products:
Gold Mirror card
Mocha- Calligraphy (CRD1853)
Ornate Flourish - Mil Chocolate Large Torn Edge Toppers (PCT2338)
Baroque Cameos (PCT1926)

Here is the box with the lid removed.

.......a little more of a side angle

here I have untied the ribbon on the top of the box
to show that there is an easel card attached, making this
a gift and a card all in one!

A closer look at the easel card

one final view.
Saturday, 14 April 2012
Ok......I know I will be in trouble for sneaking away from doing my accounts, but I just had to cheer myself up by making a card.
Here is some photos of what I have been up to.


Here is some photos of what I have been up to.

To make this card I used:
Kanban Meadow Rose - Cream Toppers (PCT2347)
Kanban Bling
Distress Inks
Embellishments from my stash

I have added this picture to show how I used the rose die cuts which were flat
and spiral cut them with scissors to make them into 3D roses

Here the card is in standing position, which shows the sentiment through
the aperture I cut with spellbinders dies.

Finally, the side view.
Good day everyone!
I am having a day of doing my dreaded accounts today (groan) although I am hoping for a little time in my workshop in between times!
Hopefully I will have some more images to upload later.
It is looking like a quiet weekend as my husband and 2nd son are working today and my daughter has gone to stay with friends until Tuesday. So it looks like its just me and my youngest son for the next few hours at least.
Wednesday, 11 April 2012
.JPG)
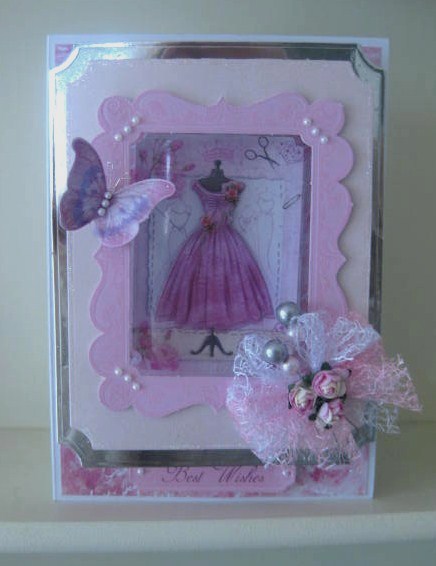
This card has been stamped using a Kanban Jasper stamp and then coloured with Promarkers.
The dress was stamped 3 times, then cut out and decoupaged in layers to give a fuller effect.
I made the background for the image with white cardstock which has been distressed with inks
and randomly stamped with a flourish swirl.
I made the background for the image with white cardstock which has been distressed with inks
and randomly stamped with a flourish swirl.

A close up of the dress which was properly laced on the bodice!

Good morning everyone!
I thought I would introduce you to my 18yr old daughter Leanne.
I am hoping that Leanne will be working alongside me in my business shortly
as she will soon have completed her exams.
As it is Easter holidays, I am also hoping that Leanne gets moving and helps me out today as I have so much to do!
Tuesday, 10 April 2012
It has been back to work after the Easter break today and straight back into double class day!
It was great to see my ladies back on form and producing some wonderful projects.
No uploads so far today for me as I have been too busy at my shop, but I am now ready to get creative in my workroom once again. Tonight the Fimo is out again!
I hope to have some more card samples to upload tomorrow.
It was great to see my ladies back on form and producing some wonderful projects.
No uploads so far today for me as I have been too busy at my shop, but I am now ready to get creative in my workroom once again. Tonight the Fimo is out again!
I hope to have some more card samples to upload tomorrow.
Monday, 9 April 2012

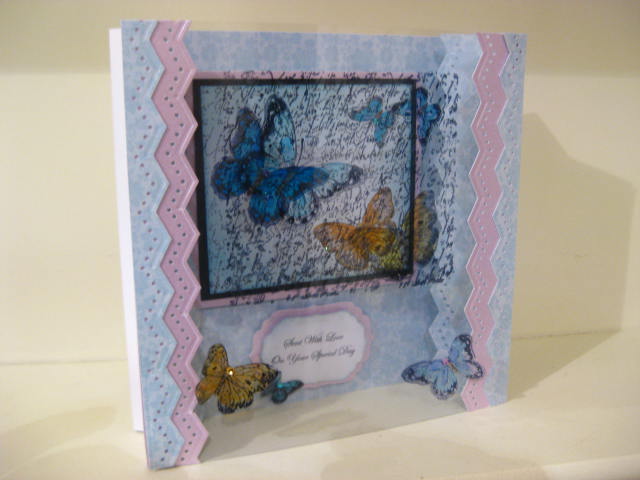
This project has been made using Kanban products:
White card stock
Butterfly Clear Stamp 03
Kanban Lilac pearlescent card stock
Fancy Floral Background Card CRD1789
Clear Acetate
White card stock
Butterfly Clear Stamp 03
Kanban Lilac pearlescent card stock
Fancy Floral Background Card CRD1789
Clear Acetate

There is a bit of an optical illusion
going on here (purposely)
as the image has been overlaid with acetate
which has been offset to give a 3D effect.
I have taken this one from a different angle
so you can see the over-lay more clearly
It is difficult to get a true effect on camera.
Subscribe to:
Posts (Atom)